2. Modules, conditions, data structures and loops#
2.1 Python Modules#
Math#
Python’s math module provides a collection of mathematical functions and constants for various numerical operations. These functions are useful for performing mathematical calculations in Python. Here are some commonly used functions from the math module:
The math.sqrt( ) function returns the square root of a number
The math.ceil( ) function returns the smallest integer greater than or equal to a given number
The math.floor( ) function returns the largest integer less than or equal to a given number
The math.pow( ) function returns the value of the first argument raised to the power of the second argument
The math.exp( ) function returns the exponential value of a number
The math.log( ) function returns the natural logarithm of a number
The math.sin( ) function returns the sine of an angle given in radians
The math.cos( ) function returns the cosine of an angle given in radians
The math.radians( ) function converts an angle from degrees to radians
Note: to see what each input a functions can take, press shift+tab or crt+shift+space within function parentheses.
import math

result_sqrt = math.sqrt(16 )
result_ceil = math.ceil(3.2)
result_floor = math.floor(3.9)
result_pow = math.pow(2, 3)
result_exp = math.exp(1)
result_log = math.log(10)
result_sin = math.sin(math.pi/2)
result_cos = math.cos(0)
result_radians = math.radians(180)

print(result_sqrt)
print(result_ceil)
print(result_floor)
print(result_pow)
print(result_exp)
print(result_log)
print(result_sin)
print(result_cos)
print(result_radians)
4.0
4
3
8.0
2.718281828459045
2.302585092994046
1.0
1.0
3.141592653589793
Listing all functions#
A docstring tooltip (like a function explanation box) is like a special helper box that appears when you press a button. It tells you what a function does and how to use it correctly, just like a special box that explains what a magic toy does and how to play with it. The function explanation box helps programmers understand functions better, making programming easier and more enjoyable.There are two very common methods to use this tooltip:
Using the help() function: To access the docstring tooltip using the help() function, you can include it in your Python code followed by the name of the function you want to learn more about. When you run the code, the docstring tooltip will be displayed in the console or output window. For example:
help (math.pow)
Help on built-in function pow in module math:

pow(x, y, /)
    Return x**y (x to the power of y).
Many popular Python IDEs offer built-in support for the docstring tooltip. Inside the parentheses of a function, you can press Shift+Tab or Ctrl+Shift+Space, and the tooltip will appear, providing the function’s documentation. This feature is available in IDEs like PyCharm, Visual Studio Code, and Jupyter Notebook.
Python third-party modules#
Besides built-in modules, there are also modules developed by other people and companies, which can be also used in your code.
These modules are not installed by default in Python, they are usually installed by using the ’pip’ or ’conda’ package managers and accessed like any other Python module.
This YouTube video explains how to install Python Packages with ’pip’ and ’conda’.
numpy#
The numpy module is one of the most popular Python modules for numerical applications. Due to its popularity, developers tend to skip using the whole module name and use a smaller version of it (np). A different name to access a module can be done by using the as keyword, as shown below. The import numpy as np statement imports the NumPy module, allowing us to use its functionalities.
import numpy as np

my_array = np.array([1, 2, 3, 4, 5])
a = np.array([1, 2, 3])
b = np.array([4, 5, 6])
result = a + b
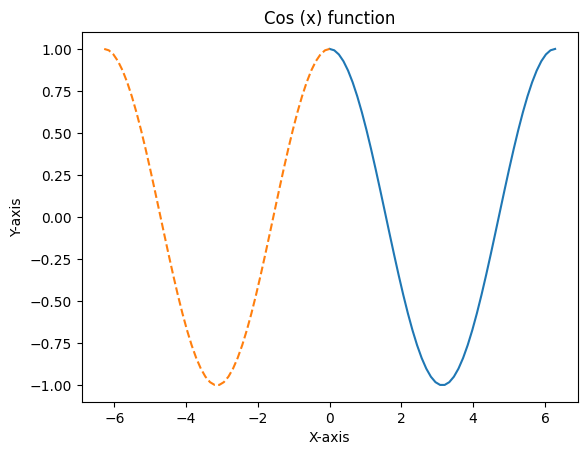
Matplotlib#
Matplotlib is a Python library widely used for creating visualizations and plots. It provides a simple and flexible way to display data in the form of graphs, charts, and other visual representations. It is commonly used in scientific and data analysis applications.
To use Matplotlib, you need to follow these steps:
Importing Matplotlib: Start by importing the Matplotlib library in your Python program using the import statement. This makes the Matplotlib functions and classes available for use.
Creating a Figure and Axes: Next, create a figure and axes objects. The figure represents the entire image or window where your plot will be displayed. The axes represent the coordinate system within the figure where your plot will be drawn.
Plotting Data: Now, use the axes object to plot your data (plt.plot() function is the most commonly used type of plot). You can choose from various plot types like line plots, scatter plots, bar plots, etc., depending on the nature of your data.
Customizing the Plot: You can customize the appearance of your plot by adding labels, titles, legends, adjusting colors, and more. This helps in making the plot more informative and visually appealing.
Displaying the Plot: Finally, you can display your plot by using the plt.show() function.
Here is a simple example:
import matplotlib.pyplot as plt


x = np.linspace(0, 2 * np.pi, 50)
y = np.cos(x)

x2 = np.linspace(0, -2 * np.pi, 50)
y2 = np.cos(x2)

fig, ax = plt.subplots()

ax.plot(x, y)
ax.plot(x2, y2, linestyle ='--')

ax.set_xlabel('X-axis')
ax.set_ylabel('Y-axis')
ax.set_title('Cos (x) function')
plt.show()
Loading Python files as modules#
Finally, you can also load your own (or somebody else’s) Python files as modules. This is quite helpful, as it allows you to keep your code projects well-structured without the need to copy and paste everything.
In order to import another *.py file as a module, you only need to have that file and your Notebook file in the same directory and use the import keyword. More info on this here.
2.2 Conditions and if statements#
In previous sections, you have acquired essential skills in Python such as variable creation, operator utilization, and code analysis. These skills enable you to accomplish a wide range of tasks. However, there is still a need for increased flexibility. Manually modifying your code to accommodate different data and reverting those changes can be cumbersome. In this section, you will delve into the concept of code control, which allows you to navigate the execution of your code based on specific conditions. To achieve this, you will explore a fundamental programming construct called the if statement. Through this construct, you will gain the ability to selectively process data based on defined conditions, enhancing the adaptability and efficiency of your code.
We have three sections:
IfStatement: The if statement enables us to execute a block of code only if a specified condition is true. It provides a way to make decisions and selectively perform actions based on whether a condition evaluates to true or false.ElifStatement: The elif statement allows us to consider multiple conditions one after another and execute different blocks of code based on the first condition that evaluates to true. It provides a means to handle various possibilities and choose the appropriate action based on the situation.If-elseStatement: The if-else statement combines the if and else statements to perform one action if a condition is true and a different action if the condition is false. It offers a way to provide alternative paths of execution, ensuring that the code responds differently based on whether a condition is met or not.
These conditional statements allow you to make decisions and control the flow of your program based on specific conditions. For example like this:
x = 5
if x > 0:
    print("x is positive")

x = -2
if x > 0:
    print("x is positive")
else:
    print("x is non-positive")

x = 0
if x > 0:
    print("x is positive")
elif x < 0:
    print("x is negative")
else:
    print("x is zero")
x is positive
x is non-positive
x is zero
2.3 Data Structures#
Welcome to an exciting new adventure in data management! In the previous module, you learned how to create variables, which was just the tip of the iceberg. Now, imagine a scenario where you have numerous variables or want to organize and access them within a single entity. That’s where data structures come into play!
Data structures are like superheroes that help us tackle complex data management challenges. They come in various forms, each with its unique purpose and complexity. Today, we’ll dive into some of the superheroes of Python’s built-in data structures: the mighty list, the versatile dict, and the steadfast tuple. These data structures provide us with powerful tools to store, organize, and manipulate data, enabling us to unleash the true potential of our code. Let’s dive in and unlock the secrets of organized data!
List#
A list is a powerful data structure in Python that allows you to store and manipulate an ordered collection of items. It’s like having a magic box where you can keep multiple things together and change them whenever you want. Let’s explore 4 different ways to create and use lists:
Creating an empty list: You can create an empty list by simply using empty square brackets [ ]. It’s like having a blank canvas ready to be filled with items.
my_list = [2,5,3]

print (my_list)
[2, 5, 3]
Creating an empty list - using the class constructor: You can also use the list class constructor list() to create an empty list. It’s another way of preparing your container for future data.
my_list = list()
Creating a list from existing data: To create a list with existing data, you can directly enclose the items within square brackets [ ], separating them with commas. It’s like assembling your collection of items in one go.
fruits = ['apple', 'banana', 'orange', 'kiwi']
print (fruits)
['apple', 'banana', 'orange', 'kiwi']
Creating a list from existing data: You can use the list constructor list( ) with an iterable (such as a string or another list) to create a new list containing the elements of that iterable. It’s like transforming one collection into another.
numbers = list(range(1, 6))  # Creates a list [1, 2, 3, 4, 5]
print (numbers)
[1, 2, 3, 4, 5]
tuple#
A tuple is a data structure in Python that allows you to store an ordered collection of items. Unlike lists, tuples are immutable, meaning their elements cannot be modified once they are assigned. Let’s explore how to define tuples and create examples:
Defining a tuple using ( ) brackets or comma: You can define a tuple by enclosing the items within parentheses () or by simply separating them with commas. It’s like creating a fixed ensemble of elements.
my_tuple1 = (1, 2, 3)
my_tuple2 = 1, 2, 3

print (my_tuple1)
print (my_tuple2)
(1, 2, 3)
(1, 2, 3)
Creating a tuple using the tuple class constructor: You can also use the tuple class constructor tuple() to create a tuple. It accepts an iterable as an argument and generates a tuple with its elements. It’s like assembling data into a coordinated ensemble.
my_tuple3 = tuple([4, 5, 6])

coordinates = (3, 5)
days_of_week = tuple(['Monday', 'Tuesday', 'Wednesday', 'Thursday', 'Friday'])

my_tuple4 = (1, 2, 3)
print (my_tuple3)
print (my_tuple4)
print (coordinates)
print (days_of_week)
(4, 5, 6)
(1, 2, 3)
(3, 5)
('Monday', 'Tuesday', 'Wednesday', 'Thursday', 'Friday')
Dict#
A dictionary is a versatile data structure in Python that allows you to store and retrieve data using a key-value pairing. It’s like having a real-life dictionary where you can quickly look up information using specific words. Let’s explore how to define dictionaries, we will explore 3 examples:
Creating a dictionary using { } brackets: You can create a dictionary by enclosing key-value pairs within curly braces { }, separating each pair with a colon ‘ : ‘ It’s like building a repository of information with quick access to specific entries.
my_dict = {"name": "John", "age": 25, "city": "New York"}

print (my_dict)
{'name': 'John', 'age': 25, 'city': 'New York'}
Creating an empty dictionary using the class constructor: You can also use the dict class constructor dict( ) to create an empty dictionary. It’s like preparing a blank canvas to populate with key-value pairs later.
my_dict2 = dict()
Creating a non-empty dictionary by specifying pairs of key-value patterns: To create a dictionary with existing data, you can specify pairs of key-value patterns within the curly braces { }. Each key-value pair is separated by a colon : and pairs are separated by commas. It’s like defining relationships between different pieces of information.
student_scores = {"Alice": 85, "Bob": 92, "Charlie": 78}
contacts = {"John": "+123456789", "Emily": "+987654321", "Sam": "+345678912"}
my_dict3 = dict()
my_dict3["name"] = "Alice"
my_dict3["age"] = 30
my_dict3["city"] = "London"

print (my_dict3)
{'name': 'Alice', 'age': 30, 'city': 'London'}
In the above code cell, we have created two dictionaries: student_scores and contacts, by specifying key-value pairs within the { } brackets. Additionally, we have also demonstrated how to create an empty dictionary my_dict3 using the dict( ) constructor and then added key-value pairs to it using the square bracket notation. These examples showcase the flexibility of dictionaries in storing and accessing data through key-value relationships.
2.4 Loops#
for loop#
for Loop: A for loop is used to iterate over a sequence (such as a list, tuple, or string) or any iterable object. It allows you to perform a set of statements repeatedly for each item in the sequence. Here is a simple example of how to use a for loop:
fruits = ["apple", "banana", "orange"]
for fruit in fruits:
    print(fruit)
apple
banana
orange
while loop#
while Loop: A while loop is used to repeatedly execute a block of code as long as a given condition is true. It allows you to keep looping until the condition becomes false. Here is a simple example of how to use a while loop:
count = 0
while count < 5:
    print(count)
    count += 1
0
1
2
3
4
break statement#
break Statement: The break statement is used to prematurely exit a loop. When encountered, it terminates the loop and resumes execution at the next statement outside the loop. Here is a simple example of how to use a break statement:
fruits = ["apple", "banana", "orange"]
for fruit in fruits:
    if fruit == "banana":
        break
    print(fruit)
apple
continue statement#
continue Statement: The continue statement is used to skip the remaining code inside a loop for the current iteration and move to the next iteration. Here is a simple example of how to use a continue statement:
numbers = [1, 2, 3, 4, 5]
for num in numbers:
    if num == 3:
        continue
    print(num)
1
2
4
5
Break down of all examples: In the first example, the for loop iterates over a list of fruits and prints each fruit. The while loop in the second example prints numbers from 0 to 4. The break statement in the third example terminates the loop when the condition is met. Lastly, the continue statement in the fourth example skips printing the number 3 and moves to the next iteration. These loop constructs provide powerful control flow mechanisms to repeat and control the execution of code blocks based on specific conditions.